Cell culture protocol for chronic pacing to mature CM Inotropy response on Maestro MEA systems.
Prepare the MEA Plate
Seed and culture cardiomyocytes on the CytoView 24-well MEA plate according to cell supplier recommendations. Note: CytoView plates are required for contractility assays. The stimulation paddle significantly increases reliability of pacing over chronic timescales. Tip: Contractility and/or “Maturation” experiments do not require special plating or handling, as compared to standard CM-MEA assays.
Begin pacing when the cells have stabilized in culture, approximately 7-14 days.
Design the Chronic Pacing Stimulus
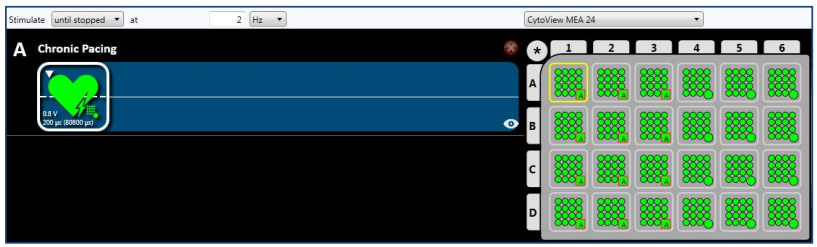
Select the Stimulation Studio module of AxIS Navigator and “Drag and drop” the Cardiac Pacing Stimulation block into the Stimulation Lane (see Figure 1).
Set the stimulation to run “Until Stopped” at the desired pacing rate. Tip: Typical maturation experiments pace at 2Hz for 48 hours. If the cells are beating faster than 1Hz spontaneously, then consider pacing at 3Hz to achieve maturation.
Double-click on the Heart Pacing Node and confirm that “Stimulation Paddles” is selected in the dropdown.
Select the “Stimulation Paddle” (elec 41) for each well you wish to chronically pace.
Test the chronic pacing stimulus to assess whether the cells are responding at the desired pacing rate, also known as “capture”. For more information, refer to sections 4.3 and 4.4 of the AxIS Navigator User Guide. Note: Default parameters will pace cardiomyocytes in most situations. To improve “capture”, increase the stimulation current or slowly increase the pacing rate to the desired level. Tip:If the cells spontaneously beat at less than 0.5 Hz, begin pacing at 1Hz for 5-10 minutes, then increase to 1.5 Hz for 5-10 minutes, and finally 2 Hz for chronic pacing.
Figure 1: Chronic Pacing Stimulus Stimulation studio is used to configure the chronic pacing stimulus. For this 24-well plate, the Cardiac Pacing Stimulation block is used to define a 2 Hz pacing stimulus with the dedicated stimulation electrode in each well on the left half of the plate. The stimulation is configured to run “Until Stopped”.
Begin Chronic Pacing
To set up the plate for a long term experiment, distribute 6-8 mL of sterile water across the on-plate reservoirs on all four sides of the plate to maintain humidity. Tip: An adhesive gas permeable membrane (Thomas Sci. - 1149R81) may also be used to reduce evaporation.
Perform a media change (e.g., half or full) according to cell supplier recommendations. Note: If media change must be performed during chronic pacing duration, allow plate to warm in an incubator for 30 minutes before restoring to the Maestro Pro or Edge.
Place the MEA plate in the Maestro Pro or Edge, and acquire a measurement in the Cardiac Real-Time → Contractility Paced configuration before chronic pacing.
Press the “Trigger” button to start the chronic pacing stimulus and confirm that the intended wells are responding to the stimulus. Tip: Use a scheduled recording (e.g., 30 s every 1 h) to track “capture”.
Perform Endpoint Assay
Press “Stop” button to end the chronic pacing after the desired duration (e.g., ~48h). Note: The effects of chronic pacing on cardiomyocyte function will revert within 2-6 hours of stopping the chronic pacing stimulus, so perform assays during this time frame. If longer assay times are required, resume pacing after treating the plate. Tip: See the “Force-Frequency Protocol” if data on the rate-dependence of contractility beat amplitude is desired.
Allow ~10 minutes for the cells to equilibrate to spontaneous beating.
Acquire the “baseline” contractility measurement (e.g., ~2 minute recording).
Apply compounds to the plate and acquire a “post-dose” contractility measurement. Note: Some compounds, such as Isoproterenol, are fast-acting and quick to desensitize. Either dose the plate live on the Maestro while recording, or begin recording as soon as the plate is back on the Maestro. Analyze the Data. Tip:If applied compounds significantly affect the spontaneous beating rate, use pacing to control for rate-dependent effects.
Analyze each file separately, or use a batch process, with the Cardiac Offline → Contractility configuration to produce the Statistics Compiler output CSV files for the “baseline” and “post-dose” measurements. Note: If the “post-dose” measurement was acquired with a live dosing, double-click the file in AxIS Navigator and edit the file segment for analysis in the Settings section.
Load the CSV files from the “baseline” and “post-dose” measurements in the AxIS Metric Plotting Tool (AMPT) to generate dose-response curves.
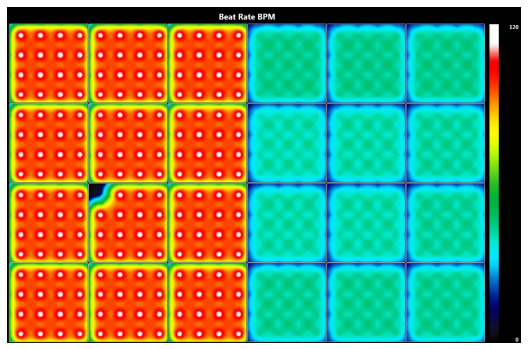
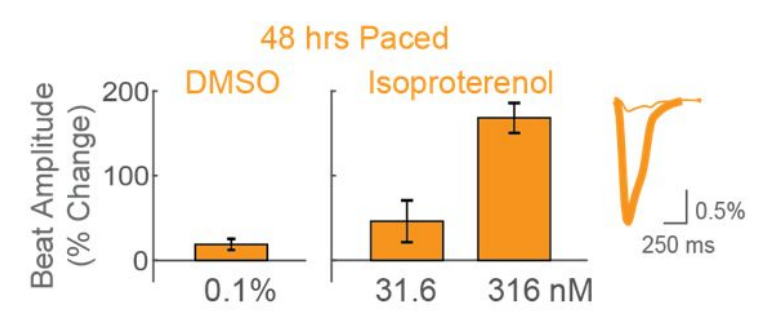
Figure 2: Chronic Pacing Activity Map Activity map during maturation with human iPSC-Derived Cardiomyocytes (iCell CM2 ) and a CytoView 24-well plate. The left half is paced at 2 Hz, while the right half is beating spontaneously.Figure 3: Maturation of Response to Positive Inotropes Human iPSC-Derived Cardiomyocytes (iCell CM2 ) respond to the positive inotrope isoproterenol with increased beat amplitude following chronic pacing at 2 Hz for only 48 hours.