From Rat/Mouse preparation

Preparing the MEA Plate
-
Pre-coat the entire well surface to improve hydrophilicity using a preferred method (e.g., poly-D-lysine, polyornithine, or 0.1% polyethylenimine).
-
Rinse the pre-coat from the culture surface with 200 µl of sterile DI water 4 times, then allow the MEA plate to air dry for at least 2 hours.
-
Prepare ~150-300 µm slices from desired region of rat/mouse brain following an established slice preparation protocol.
Tip: Thick slices will have trouble with gas exchange at the electrode interface and thin slices will break apart under handling.
Positioning the Slice on the MEA Plate
-
Using a 1 mL micropipettor, with the pipette tip end cut to increase the bore size, transfer the tissue slice to the well with enough solution volume to allow free movement of the slice into position on the electrode array.
-
Using a fine-to-medium tip soft sample brush (e.g., histology camel hair brush) gently position the slice into the desired general orientation over the array and slowly remove the aCSF down to approximately 100-200 µL (enough volume to move the slice, but keep it contained over and touching the array).
Tip: The aCSF volume can be adjusted to allow for varying degrees of movement as required to position the slice. -
Use the 1 mL micropipettor with an unmodified tip to very gently remove the remaining aCSF, pushing the slice down onto the array via surface tension. It may be necessary to do this in stages – remove a little aCSF and then reposition the slice if it moves during solution removal. Repeat until aCSF is completely removed and slice is adhering to the array – there should be just enough solution (~100 µL) remaining to keep the tissue hydrated.
-
Leave the slice on the array for 20-30 seconds to adhere, repositioning as necessary.
-
Pre-wet the slice anchor in aCSF and dab excess on Kimwipe. Place the slice anchor on the tissue in one attempt if possible, trying diligently to avoid slice movement. It may be necessary to remove the anchor, reposition the slice and try again, remaining conscious to avoid any additional slice movement.
Tip: Be patient with the slice anchor placement. Ideally, you only want to drop the anchor once. Small position adjustments may be possible with the anchor on top of the slice, but should generally be avoided. It will take some practice using the forceps and anchor to become accustomed to the challenging angles involved. -
Place ~50-200 µL of aCSF on the slice and anchor, just enough to keep the tissue hydrated and healthy, and leave the slice in the well for ~60 seconds to allow for functional adherence to the array.
-
Look at the final slice placement under the microscope to ensure the position is correct. If the slice is slightly off the target region, very carefully make final placement adjustments, but only if the movement is minute in scale.
If significant repositioning is necessary, pull off the anchor, add more aCSF to the well to detach the slice, and carefully reposition as needed.
Establish Baseline Activity Measures and Conduct Treatment
-
Place the MEA plate on the Maestro and begin streaming. Apply a Neural Configuration for acquisition settings. Please note these settings are for Maestro Pro and Edge. Original Maestro settings may vary from this, please consult your user guide.
Tip: After 10 minutes, if there is no spike activity, add fresh aCSF to the well to try and activate the slice, repeat as necessary -
Allow 10-20 minutes for stable baseline activity to emerge. Once stable, record a baseline file and proceed with preferred treatment.
Slice Placement
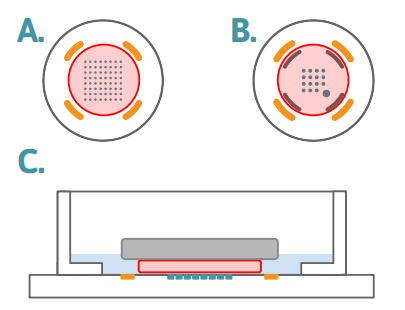
Figure 1: Slice Placement Diagram The layouts above represent the bottom surfaces of wells in (A) a 6- or 12-well MEA, and (B) a 24-well MEA. The number of electrodes per well is different across the plate formats, however the slice placement is the same, with the slice (red circle) centered on the recording electrodes and staying within the ground electrodes. On plate types with the addition of the stim-paddle in the lower right corner of the array, it is important to make sure the slice covers this feature. The side profile diagram in (C) demonstrates the anchor (grey) holding the slice (red) down over the electrode array (teal), with aCSF (blue) just covering the slice to allow for sufficient oxygenation during recording.
Visualization of Typical Hippocampal Slice Results
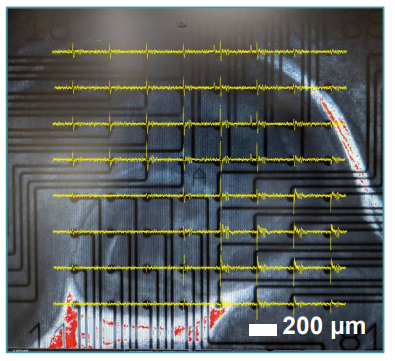
Figure 2: Hippocampal Brain Slice Morphology Mouse hippocampal brain slice in a 12-well CytoView MEA, 10x magnification. Notice the slice morphology and positioning. Spontaneous spike activity is overlaid in (yellow).
Required Materials
Consumables
| Item | Vendor | Catalog # |
|---|---|---|
| Axion MEA (6, 12, or 24-Well) | Axion BioSystems | |
| Artificial Cerebrospinal Fluid (aCSF) | Various | |
| Poly-D-Lysine | Thermo Fisher | A3890401 |
| 50% Polyethylenimine Solution (PEI) | Sigma-Aldrich | P3143 |
| Dulbecco’s PBS without Ca2+/Mg 2+ | Thermo Fisher | 14040 |
| Kimwipes | Various | |
| 15 mL and 50 mL Centrifuge Tubes | Various | |
| 1 mL Pipette Tips | Various |
Equipment
| Item | Vendor | Catalog # |
|---|---|---|
| Maestro Pro or Edge MEA System | Axion BioSystems | |
| AxIS Navigator | Axion BioSystems | NA |
| Slice Anchor | ALA Scientific Inst. | HSG-MEA-5CD |
| Histology Camel Hair Brush | ||
| Forceps | ||
| Phase Contrast Microscope | Various | |
| 1 mL Micropipettor | Various |